Wood Filler on Hardwood Floors: Restoring Beauty and Durability
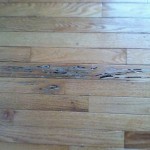
Hardwood floors, with their timeless elegance and durability, are a coveted feature in many homes. However, over time, these floors can sustain damage, leaving behind unsightly gaps, scratches, and dents. This is where wood filler comes in, acting as a crucial tool for restoring the beauty and integrity of hardwood floors. Wood filler is a specialized paste or putty designed to fill in imperfections, creating a smooth, seamless surface that can be sanded, stained, and finished to match the surrounding floor.
Understanding Different Types of Wood Filler
The type of wood filler best suited for hardwood floors depends on the specific application and the severity of the damage. Here are some common types:
- Wood Putty: This is a traditional filler that comes in various wood tones and is easy to apply. It's suitable for filling small cracks, nail holes, and minor dents.
- Epoxy Wood Filler: This type is renowned for its strength and durability. It's ideal for filling larger holes, cracks, and gaps, especially in high-traffic areas.
- Wood Dough: This filler is kneadable and can be shaped easily, making it perfect for contouring around intricate details or filling deep gouges.
- Paste Wood Filler: This filler has a thick, paste-like consistency that allows for precise application and is suitable for filling small to medium-sized imperfections.
The choice of filler should be based on factors such as the size and depth of the damage, the desired level of strength, and the specific type of wood.
The Process of Using Wood Filler on Hardwood Floors
Filling imperfections in hardwood floors with wood filler is a relatively straightforward process that involves these steps:
1. Preparing the Surface
Before applying wood filler, it's essential to prepare the surface thoroughly. This involves cleaning the area with a damp cloth to remove any dirt or debris. If there are loose pieces of wood, they should be carefully removed. For deep gouges, a chisel or other appropriate tool can be used to clean out the area for proper filling.
2. Applying the Filler
Once the surface is clean and dry, the wood filler can be applied using a putty knife or a spatula. The filler should be packed firmly into the damaged area, ensuring that it is flush with the surrounding surface. For larger imperfections, multiple applications may be necessary. It's crucial to remove any excess filler before it dries, as this can create uneven surfaces.
3. Allowing the Filler to Dry
The drying time for wood filler varies depending on the specific type used. However, most fillers will be dry to the touch within 24 hours. It's important to follow the manufacturer's instructions for drying time. During the drying process, avoid disturbing the filler, as this could lead to surface imperfections.
4. Sanding and Finishing
Once the filler is dry, the filled area can be sanded to create a smooth, uniform surface. The sanding process should be done gradually, starting with a coarse grit sandpaper and progressing to a finer grit to achieve the desired finish. After sanding, the filler can be stained and sealed to match the surrounding floor.
Tips for Successful Wood Filler Application
Here are some additional tips to ensure a successful application of wood filler on hardwood floors:
- Choosing the Right Color: Select a wood filler that closely matches the color of your hardwood floor. Many fillers come in various shades, allowing for a seamless blend.
- Testing the Filler: Before applying the filler to the entire area, test it on a small, inconspicuous spot to ensure it blends properly with the existing finish.
- Using a Damp Cloth: Wipe away excess filler with a damp cloth to avoid creating uneven surfaces. This is especially important for fillers that dry quickly.
- Avoiding Overfilling: Avoid applying too much filler, as this can lead to uneven surfaces and excessive sanding.
- Patience is Key: Allow the filler to dry completely before sanding or applying any additional finishes. This ensures the filler adheres properly and prevents any imperfections.
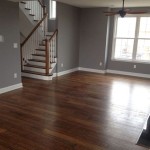
By following these tips and using the right type of wood filler, you can effectively restore the beauty and durability of your hardwood floors, ensuring their longevity and enhancing the overall aesthetics of your home.

What Is The Best For Filling Gaps In Floorboards Mr Sander

Woodfiller For Hardwood Floors Advice

Filler Facts Wood Isn T Always The Right Solution Rosebud Floors

Woodfiller For Hardwood Floors Advice

The Benefits Of Wood Filler Are Greatly Exaggerated Hardwood Flooring Experts Petes Floors

How To Fill In Gaps Between Hardwood Flooring With Wood Filler

The Fundamentals Of Sanding Wood Floors Part 4 Filling And Fine Hardwood Magazine

Woodfiller For Hardwood Floors Advice

Filler Facts Wood Isn T Always The Right Solution Rosebud Floors

Best Wood Filler To Match For Furniture Repair Hardwood Floors New Woodwork Mohawk How