Make Your Own Wood Flooring
Installing wood flooring is a great way to add warmth and beauty to your home. It's also a relatively easy project that you can do yourself, even if you're a beginner. Here's a step-by-step guide on how to make your own wood flooring.
Materials You'll Need
The first step is to gather the materials you'll need. Here's a list of the essentials:
- Wood planks: You can use any type of wood you like, but oak, maple, and pine are popular choices.
- Tongue-and-groove flooring: This type of flooring has a tongue on one edge and a groove on the other, which makes it easy to install.
- Underlayment: This material goes under the flooring to provide cushioning and soundproofing.
- Nails or screws: You'll need these to secure the flooring to the subfloor.
- Hammer or nail gun: This is used to drive the nails or screws.
- Circular saw: This is used to cut the wood planks to length.
- Miter saw: This is used to cut angles in the wood planks.
- Wood glue: This is used to adhere the wood planks to the underlayment.
- Sandpaper: This is used to smooth the surface of the flooring.
- Polyurethane: This is a protective coating that is applied to the flooring to protect it from wear and tear.
Step-by-Step Instructions
Once you have all of your materials, you're ready to start installing the flooring. Here's a step-by-step guide on how to do it:
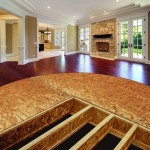
- Prepare the subfloor. The first step is to prepare the subfloor. This involves cleaning it, leveling it, and making sure it is dry.
- Install the underlayment. The next step is to install the underlayment. This material goes under the flooring to provide cushioning and soundproofing.
- Lay out the first row of flooring. The first row of flooring should be laid out parallel to the wall. Make sure to leave a small gap between the flooring and the wall to allow for expansion.
- Nail or screw the first row of flooring. Once the first row of flooring is laid out, you can nail or screw it to the subfloor.
- Continue laying the flooring. Once the first row of flooring is secured, you can continue laying the rest of the flooring. Make sure to stagger the joints between the planks.
- Cut around obstacles. As you're laying the flooring, you will need to cut around obstacles such as doorways and fireplaces. Use a circular saw to make these cuts.
- Sand the flooring. Once the flooring is installed, you can sand it to smooth the surface.
- Apply polyurethane. The final step is to apply polyurethane to the flooring. This will protect it from wear and tear.
Tips for Installing Wood Flooring
Here are a few tips for installing wood flooring:
- Make sure to use the right type of underlayment for your flooring. Some underlayments are designed for specific types of flooring, so it's important to read the instructions carefully.
- Don't nail or screw the flooring too tightly. This can cause the wood to buckle and crack.
- Leave a small gap between the flooring and the wall to allow for expansion. This will prevent the flooring from buckling when it expands and contracts.
- Use a sanding block to sand the flooring. This will give you a smooth, even finish.
- Apply polyurethane to the flooring in thin, even coats. Allow each coat to dry completely before applying the next one.
Conclusion
Installing wood flooring is a great way to add warmth and beauty to your home. It's also a relatively easy project that you can do yourself, even if you're a beginner. Just follow the steps in this guide and you'll be able to create a beautiful wood floor that will last for years to come.

Make Your Own Plank Flooring Using 1 X 12 Lumber Hallstrom Home

Make Your Own Plank Flooring Using 1 X 12 Lumber Hallstrom Home

Diy Hardwood Floors Under 1 50 Sq Ft The Harper House

Lay Your Own Wood Floors Installing Real

Make Your Own Geometric Wood Flooring Manmadediy

Diy Hardwood Floors Under 1 50 Sq Ft The Harper House

Make Your Own Plank Flooring Using 1 X 12 Lumber Hallstrom Home

Diy Hardwood Flooring Before And After

How To Install An Inexpensive Wood Floor That Looks Like A Million Dollars Make Decoration Home Diy On Cut Out Keep

Inexpensive Wood Floor That Looks Like A Million Dollars
